Wednesday, 8 June 2011

Speed/Posistion Sensors (off car)

Magnetic reluctor sensor


www.evgen-autotronics.blogspot.com


this sensor has a stationary magnet that has a metal gear with teeth spinning around and every time a tooth passes by the magnet it charges up the winding by the magnet. when the tooth moves past the magnet, the voltage in the winding collapses.

to service this sensor you have to check the air gap between the teeth and the magnet with a brass feeler gauge.


the specifications on the distributor i had were that the air gap had to be between 0.2-0.4mm. i measured 0.3mm so my distributor was is within specification

I then hooked this sensor up to a 5 volt input supply and a ground. i then also hooked up my oscilloscope to the output and ground.
as i turned the gear on the sensor, and the the teeth move towards the magnetic pickup. the voltage slowly went up and down in a wave form ranging from up to 492.7mv


below is a picture of the wave form on the oscilloscope

Each y axis grid = 100mv       Each x axis grid = 100ms


HALL EFFECT SENSOR


www.autrotronicsstudies.blogspot.com


this sensor is another type of distributor and has a magnet and a integrated circuit which picks up the magnetic field. when the rotor spins through the signal between these to objects it has broken the magnetic circuit and it collapses.

this sensor has 3 wire inputs
- 5 volt input
- ground
- output signal

I then hooked up my sensor to a 5 volt battery supply on the 5 volt input wire and the ground wire.
i then put my voltmeter on the output signal wire and the ground wire.

Once i had hooked these up, i then turned the gear to different angles, every 45° up to 180°  and recorded my data:


Degrees Turned Voltage
0° 1.08v
45° 4.5v
90° 1.08v
135° 4.5v
180° 1.08v

when my reading was 1.08v it was because the rotor was in the way of the integrated circuit and when my reading was 4.5v it was because there was nothing in the way of the integrated circuit.

i then hooked up an oscilloscope to this sensor and recorded a graph to get specific data on what the voltage was doing:
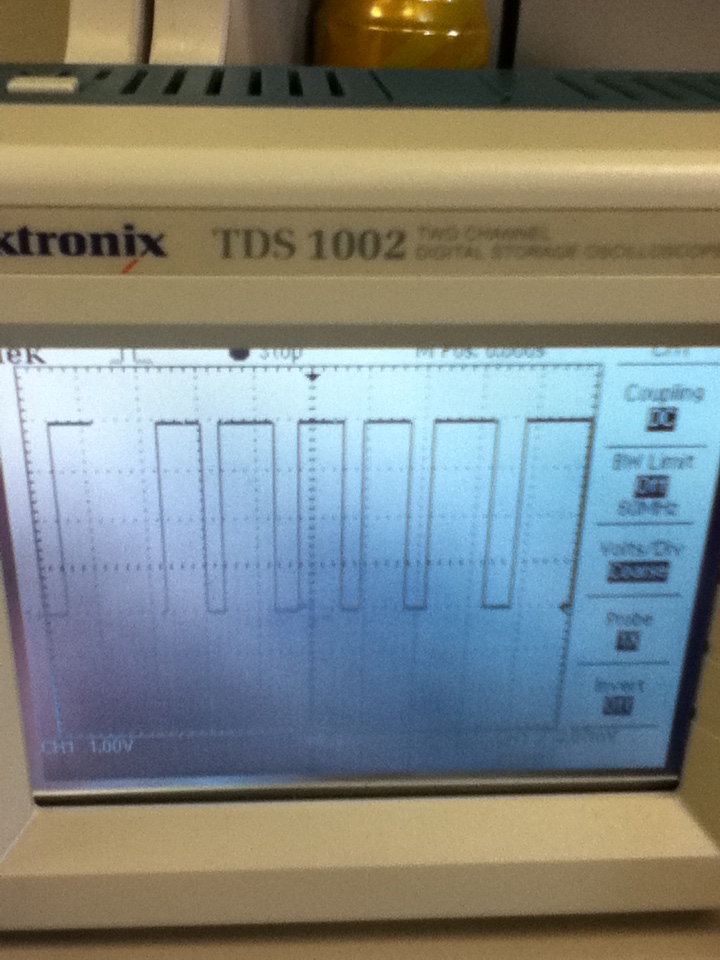


as the rotor goes between the integrated circuit the voltage goes strait down and as it passes through, the voltage goes strait up again, there is no slope because it cuts off strait away.


OPTICAL DISTRIBUTOR

www.vic-4826.blogspot.com


This sensor works by sending an infa-red signal to a photo electric pick up, when the the chopper blade spins around it blocks the signal and breaks the circuit.

There is 3 wires that this sensor has
-5 volt input
-earth/ground
-signal output to ecu

when the chopper plate is in the way of the infa-red signal, the distributor is firing. when the blade is not in the way, it is changing up.

below is a table of results i recorded when i hooked up a 5 volt battery supply to the input and ground wires and multimeter to the output signal and ground wires.
i rotated the gear on the distributor to certain angles and measured the voltage output to the ecu.

Position Voltage
0° 0.5v
30° 4.5v
60° 0.5v
90° 4.5v
120° 0.5v

when the voltage is 0.5v, it is when the chopper plate is blocking the infa-red signal and no voltage is being passed through to the photo electric pick up.
when the voltage is 4.5v, it is when the chopper plate is not blocking the infa-red signal and the circuit is being aloud to pass be completed.

i wired up an oscilloscope to the sensors output and ground wires, i also had the 5 volt battery supply wired up to the input and ground wires.

below is a recording of what the oscilloscope was reading:


as you can see. when the wave is up , this is when the chopper plate is not covering the signal but then when it quickly drops, that is when it is being covered by the chopper plate.


The hall effect and optical sensor both put out an easy to mange digital signal but the magnetic sensor puts out an analogue signal which has to go through analogue to digital converter.

all of these sensors are located on the distributor at the tip of the cam shaft but the optical and hall effect sensors can be used as crank angle sensors also.

Oxygen sensor (off car)

oxygen sensor


this sensor is one on the most important sensors of the modern engine, it tells the ecu if the engine it tells the ecu if the engine is running ritch or lean.
the sensor is not being used during warm up because the engine is in open loop. this means that the injectors are squirting a specific amount of fuel into the combustion chamber during engine warm up.
once the engine reaches its ideal running temperature (depending on manufacture, around 300°C) this is when the oxygen sensor is warmed up and starts sending signals to the ecu (closed loop)

this sensor may have 1 to 4 wires depending on manufacture:
signal wire
ground wire
heater positive
heater ground

if the engine is running to lean the output to the ecu will be around 0.2 volts and if the engine is running too ritch the output to the ecu will be around 0.8 volts (depending on manufacture)

Knock Sensor

knock sensor

www.iapdirect.com

this sensor has a piezoelectric device that creates its own voltage when it gets shaken.
this voltage gets sent to the ecu which will change the timing to stop the knock from happening.

This sensor has 2 pins (earth and a 5 volt input). it doesn't matter which pin is used.
i put an oscilloscope on these pins and knocked the sensor on the table, this is the wave form picture i recored.

Engine Coolant/ Air Temperature Sensor (off car)

engine coolant/ air temperature  sensor


www.elise-shop.com


the coolant and air temperature are the same and are both a NTC type (negative temperature coefficient), this means that when the temperature rises, the resistance in the sensor will lower. this means that is will send a higher voltage to the ecu when the engine gets hot (operating temperature).
Generally there is a 5 volt input to the sensor and when the engine is cold, the output to the ecu is around 1 volt, when the engine is at operating temperature it is around 4.5 volts.


www.wiringdiagrams21.com

The 2 prongs on the sensor are a earth and a 5 volt input (doesn't matter which)
This works by changing the voltage output the the ecu receives by changing the resistance as the temperature changes.

TESTING COOLANT TEMP SENSOR
to test this sensor i heated up some water in a bowl starting at 33°C and ranging up to 75°C.
as the temperature increased i measured the resistance between the two windings of the sensor which was decreasing as it got hotter.

i then recorded some data at different temperatures of the sensor:


Water Temperature Resistance
33°C 1.36 k ohms
35°C 1.33 k ohms
40°C 1.14 k ohms
45°C 0.96 k ohms
50°C 0.78 k ohms
55°C 0.68 k ohms
70°C 0.46 k ohms
75°C 0.39 k ohms


TESTING AIR TEMP SENSOR

when i tested this sensor i also got a bowl and heated up the water, i started at room temperature and then put it in the bowl which was up to 55°C.

to measure the resistance i put my ohmmeter on the two prongs of the sensor and recorded my readings:


Temperature Resistance
room temp 1.81 k ohms
35°C 1.57 k ohms
40°C 1.23 k ohms
45°C 1 k ohms
50°C 0.87 k ohms
55°C 0.71 k ohms

Monday, 6 June 2011

MAF sensors (Mass Air Flow) On/Off car

OFF CAR

Hot Wire Airflow Sensor

Note: i did test this type of sensor.


www.autospeed.com


This sensor has 3 main wires (5volt power, earth, analogue signal)
when the engine is at idle and the throttle butterfly is closed the output voltage of the sensor is around 1 volt. When the throttle butterfly is fully open the output voltage of the sensor is around 4.5 volts.
To test this sensor you must set your voltmeter to read 20 volts and place your negative probe on the earth wire of the sensor and your positive probe on the output signal wire of the sensor.
you must then hook up a 5 volt battery supply to the 5 volt power terminal and the earth terminal.
once you have done this, you need to get a hair dryer or something to blow into the sensor the give you different voltage readings.

This has a thermistor inside of it and when the revs go up increasing the airflow, the thermistor cools down and makes the resistance lower. this means there is more voltage to ecu which tells us the throttle is opening more.


Vane/Flap type air flow sensor


www.kjfgb-hteyc.tk


this type of airflow meter has also got 3 main wires (5 volt input, output, earth)
to test this sensor you must set your voltmeter to 20 volts, place your negative probe on the earth terminal, place your positive probe on the output terminal. you must then have 5 volt battery supply to the input terminal and the also connect it to the earth if the sensor.
once all of these thing are hooked up slowly move the flap on the inside of the sensor, your voltage should slowly go up.
when the flap is closed it thinks the engine is at idle and is only sending 1 volt to the ecu, when the flap is fully open it thinks the engine is at open throttle sending around 4.5 volts to the ecu.

i created a graph at the different angles i had the flap open at and the voltages i was reading:


vane angle voltage output
0° 2.2V
20° 4.7V
40° 6.8V
60° 7.6V
80° 8.1V
100° 8.5V
120° 9.4V

as the flap opens more, it creates a greater voltage output to the ecu

MAP sensors (on/ off car)

OFF CAR

The MAP sensor (manifold absolute pressure) senses how much vacuum there is inside the inlet manifold, when there is more vacuum, there is less output voltage to the ecu. when the sensor is reading a low vacuum there is a higher voltage to the ecu. When the throttle is wide open the sensor will be reading a very low vacuum because all of the pressure is being sucked into the engine, this means the manifold can not build up enough pressure to give a big reading to the ecu so it sends a small voltage, this makes the fuel injectors stay open for longer to put more fuel into the engine.

When the throttle is closed then engine is building up vacuum because not much pressure can get into the manifold, this means that the engine vacuum is sucking and the vacuum inside the manifold gets bigger creating a greater voltage to the ecu, this means the engine is at idle and will tells the injectors to stay open for only a short amount at a time to limit the fuel into the combustion chamber.

www.atspeedracing.co.uk


The Map sensor has a input for a tube where it get the vacuum from the manifold. it has 3 terminals on it (5 volt input, earth and a output voltage that it sends to the ecu)

To test this sensor i had to use a devise that creates vacuum and put it onto the vacuum tube input. I then had to give the sensor a 5 volt battery supply which i hooked up to the 5 volt terminal, i also put the negative clip of the battery supply to the earth terminal of the sensor. Once i did that i measured the voltage output with my multimeter, i set it to read around 20 volts and then placed my positive prong on the output pin of the sensor and my negative prong on the earth terminal of the sensor.

below is a picture of the devise i used to apply vacuum to the sensor:

www.autotechnique.fr


the more vacuum i applied, the less the voltage output to the ecu

Wednesday, 1 June 2011

throttle position sensor (off car)

Potentiometer Type:

this sensor has a sliding contact that moves every time the throttle is moved. the sensor is supplied a voltage by the ecu and as the throttle moves it creates a bigger voltage output (idle is around 0.5 volts and wide open throttle is around 4.5 volts)


i connected my sensor to a 5 volt supply and measured the angles i set it at.
i then used my volt meter to check the voltage output that the sensor was giving, i did this by putting my negative probe on the "ground" pin out on the sensor and putting my positive probe on the "output' pin out on the sensor. each time i changed the angle of the throttle butterfly i got a different reading which increased as i opened throttle wider.


Throttle Angle Voltage Output
0° 0.714V
22.5° 1.15V
45° 1.96V
67.5° 2.76V
90° 3.86V

I then created a table to record my data:


this table shows that the wider i opened the throttle, the higher the voltage output.


Switch Type:


this throttle position sensor is a switch type, it usually only has two contact points (wide open throttle and closed throttle). it generally has three pins (idle, voltage in, full throttle)

to test this sensor you need to check the resistance, you do this by putting your negative prong on the earth pin and your positive prong on the idle pin (make sure throttle is closed), you should get a very minimal reading around 1.4ohms.
you then place your positive prong on the wide open throttle pin (make sure the throttle is wide open) your should also get a very minimal reading around 1.4ohms

i recorded a graph to explain my reading better: